Welcome To Our Little Big House On The Prairie


Showing posts with label distressing. Show all posts

Wednesday, April 11, 2012

Dining Room Table: Reveal


I apologize in advance for those of you who voted for the book shelves to be done first, instead of the dining room table.  Unfortunately, the book shelves require Scott's know-how and the dining room table did not.  I'm still waiting on the trim for the book shelves.  I really should learn how to operate power tools.  LOL

Anyhoo...

The dining room table was my Mom and Dad's.  After their divorce, my Dad got the dining room table and when he died, I got it.  My Dad was all about wood, like most typical men.  Stained wood furnishings were the rule of thumb in his house.  Needless to say, I inherited quite a bit of paintable furniture.  He's probably rolling over in his grave, somewhere in Delaware Bay.  Sorry Daddy, but the wood has got to go.  I know you would still love me anyway. :D

Okay, so on that morbid note, here's the before pic taken shortly after we moved into our house.

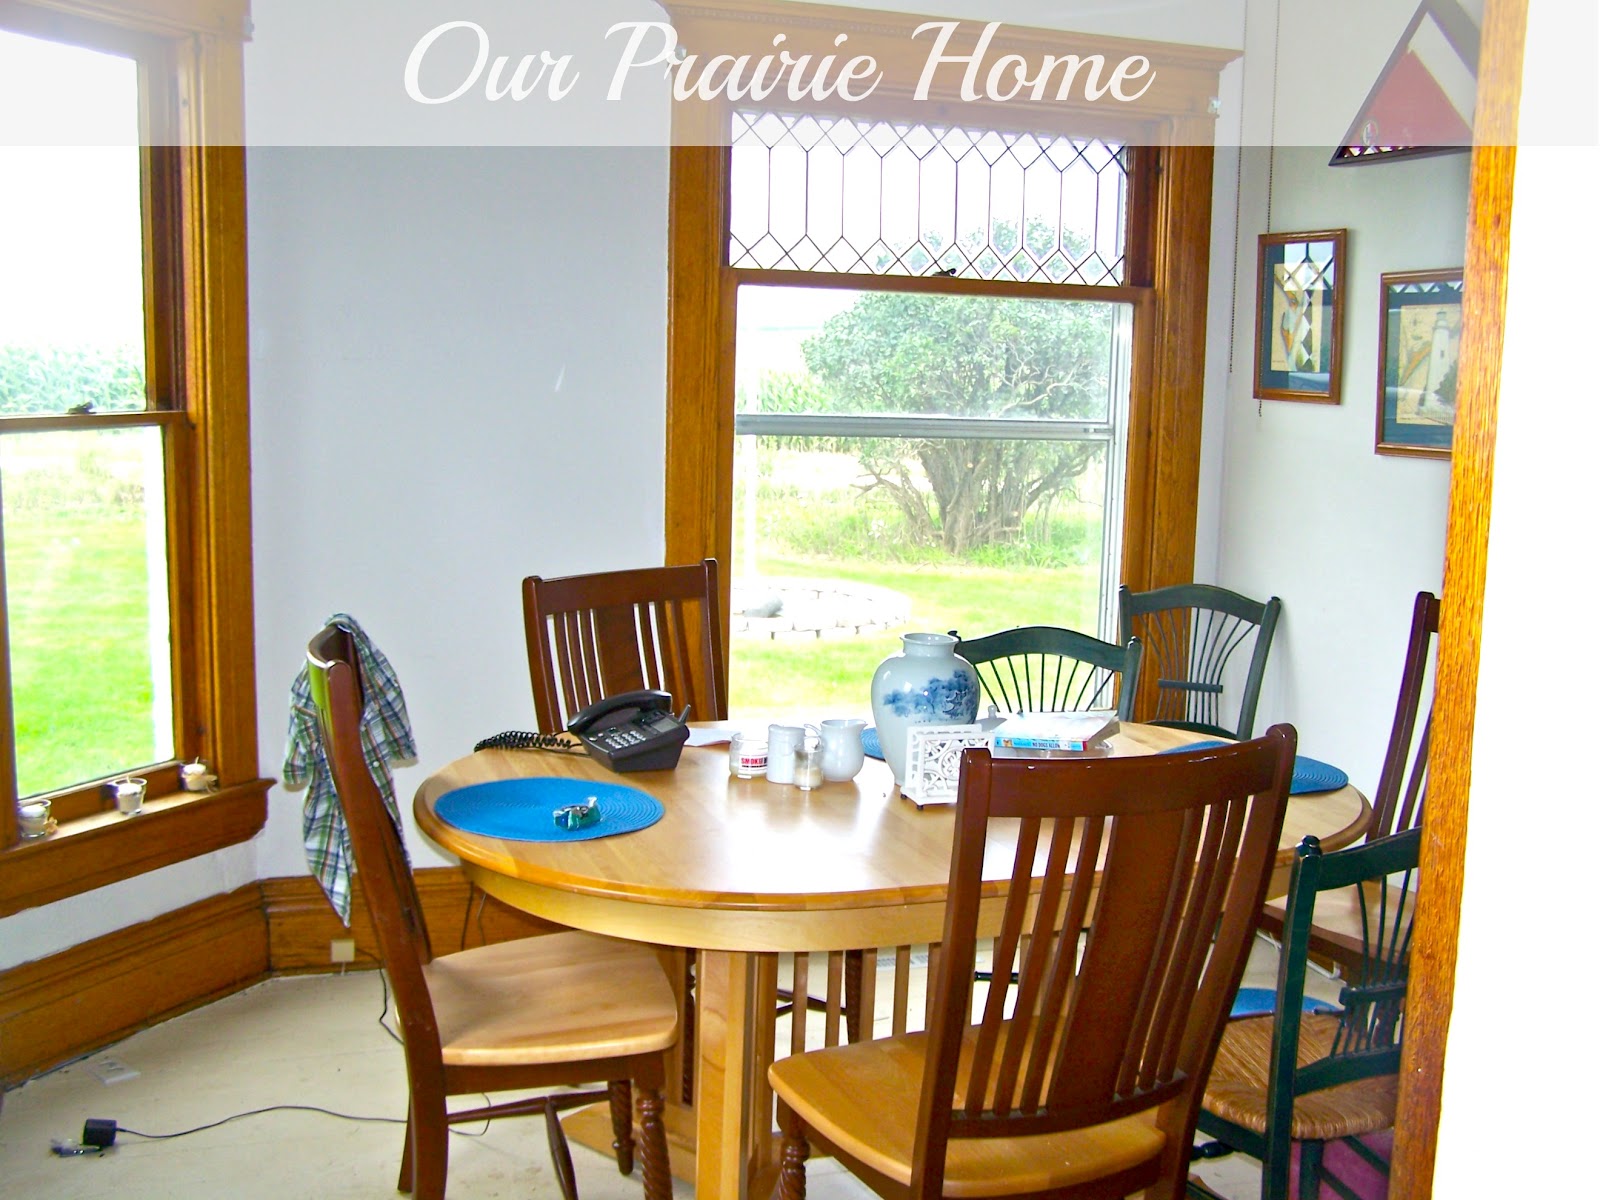
I still can't believe that this was the office!

After five years of basically using it from everything from meals to homework to school projects to crafts, it was looking mighty rough.  When I questioned my mom as to why in the world they bought a maple table because its such a soft wood, she said, "Because it was on sale."  Oooookay then.

So, I wiped her down and did some light sanding for prep:


And the same with the chairs:


I had to sand a little heavier on the edges of the tops and sides because they were knicked and dinged to death.

Using my trusty chalk paint recipe, I painted the top with "Cotton Balls" by Benjamin Moore and the bottom, my favorite color ever...  "Covington Blue" from the Benjamin Moore Historical Series.  Its a blue without being a blah blue.  Depending on the light, it can take on almost an aqua-y feel without being aqua.  Its a lovely color.


 I debated on going all white for quite some time, but as I usually do, I went off of what I am drawn to in my home decor magazines.  And its always the tables that the bases are painted blue.  Every.  Time.


And you know me with my "too much white" thing going on.  And of course I had to "make it look old".  ;)


And I can tell you its no fun trying to reveal a piece of furniture and get a good picture of it when the room is still in demo stage.  LOL


 So, just try to ignore the half painted book shelf with its missing trim and the destroyed wood floors that we've finally decided just to paint.  Obviously having someone come in and re-do them just ain't going to work.  The pine is just too soft to withstand our foot traffic and I'm not going to throw another $900.00 out the window for the floors in the office and the dining room again, only to have them look like they do now... Again.  Contractor horror stories, anyone?


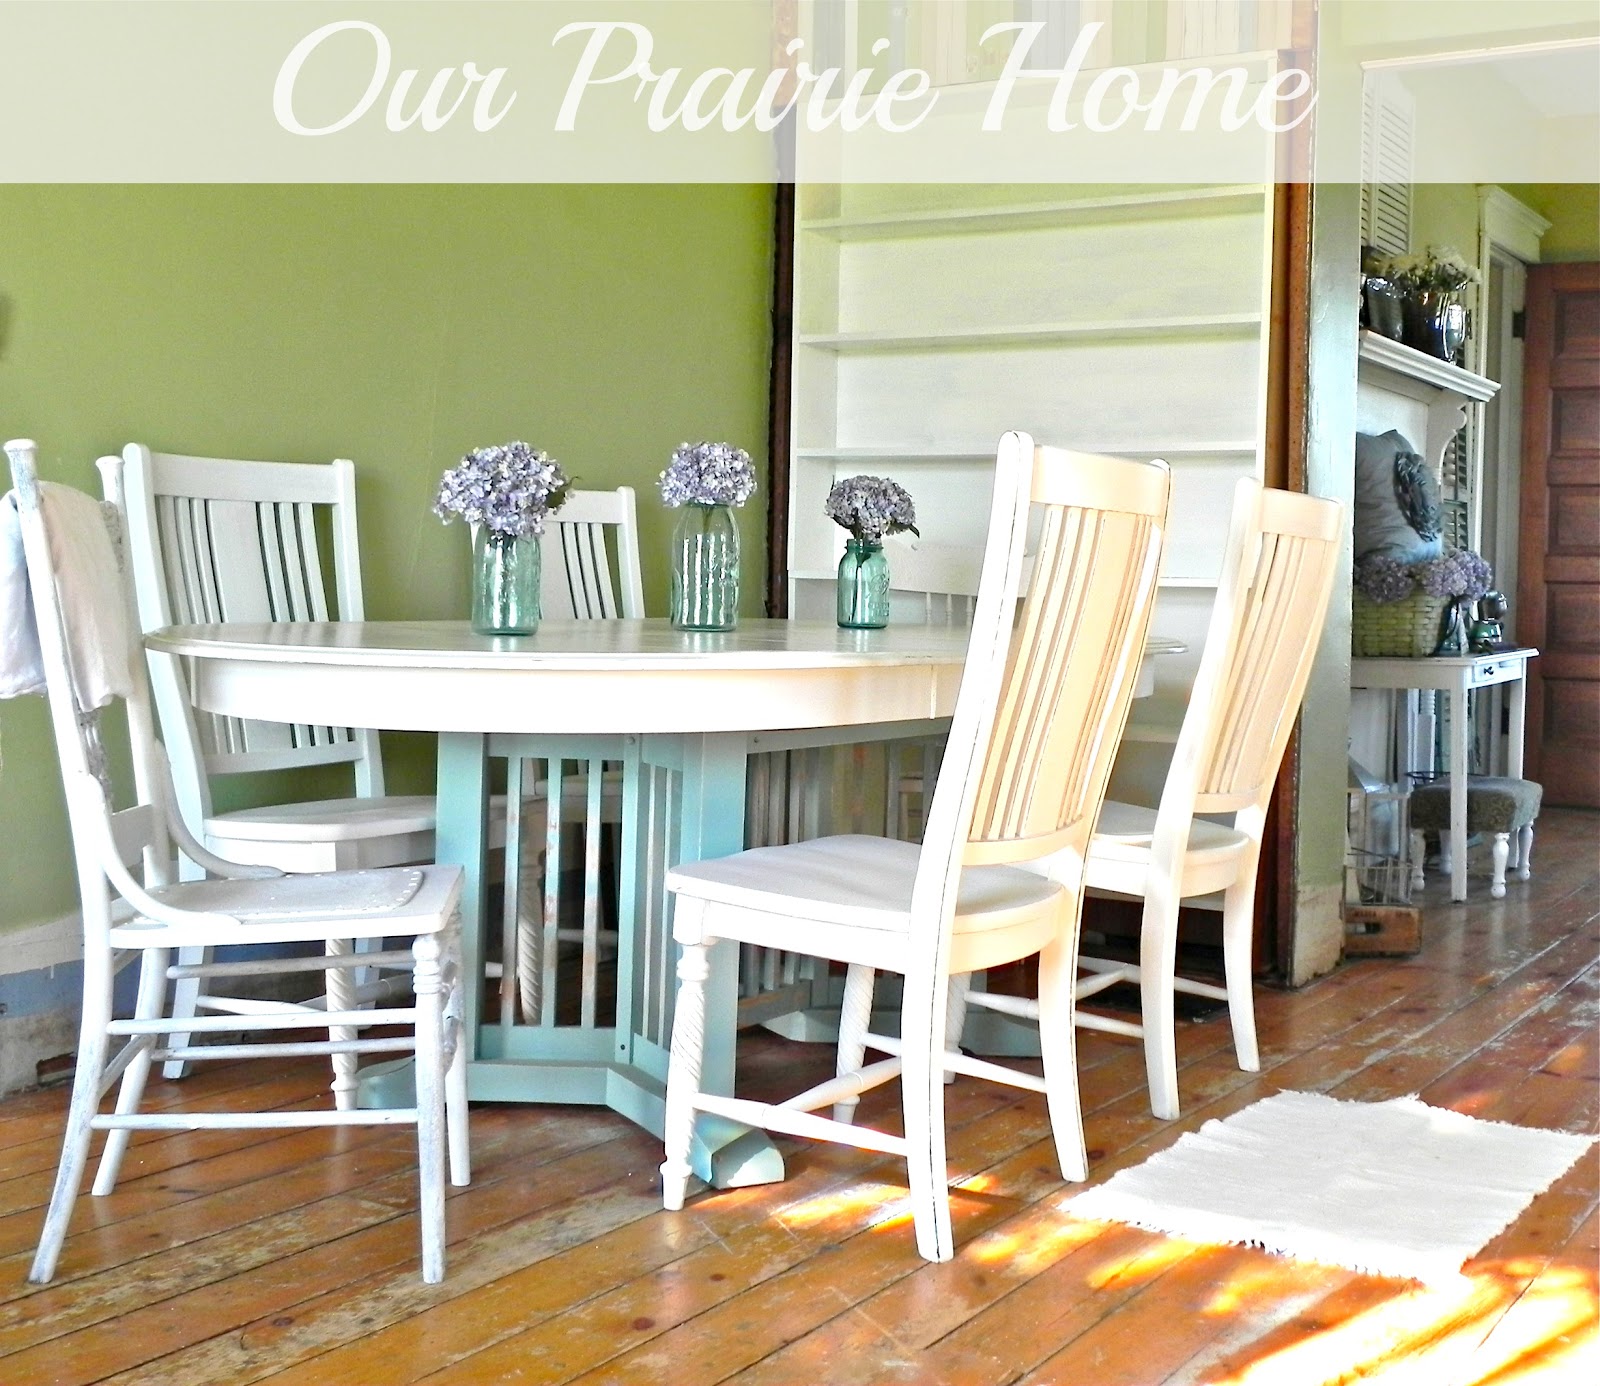
I am still amazed at how much going lighter has made a difference in the atmosphere of our home.  Its so much more cheerful and relaxing.  

My goal is to get a bench to go on the wall side of the table, so it can be pushed back against the wall when not in use.  For now, painting the two oak pressback chairs to match works.  Plus, a bench will seat three of my rugrats, making room for everyone at the table.

I can't wait to get the wainscoting done, so I can hang that gorgeous mirror on the wall above the table.  Scott?  Are you reading this???  ;)


Next...

My Dad's rocking chair or the china hutch.  I haven't decided yet.  Check out my facebook page for new uploads of the china hutch.  We picked her up last night.  :D

XO,

Linking up to:

Friday, April 6, 2012

Pine Chimney Cabinet

Back in January when I revealed my office makeover, I told you I would tell you about the fiasco that was my pine chimney cabinet.  The best makeover stories are the screw-ups with the happy ending, I think.

A chimney cabinet or cupboard was used during the 1800's in the small narrow space in between the chimney and the wall.  Mostly used for utility storage, it was a great use of a small space.  I have no idea how old the one I found in the "Mart of Doom" (you can read while I call it that HERE) is, but it has definitely seen some wear and tear.

I managed to talk good ol' Gene down to $50.00 from his $75.00  asking price, so at least I saved a wee bit on it.


Probably still paid too much for it, but what-ev.  Serves its purpose just fine.


It was really disgustingly gross on the inside - as are most things from the "Mart of Doom", but it cleaned up really well.

Initially, my idea was to remove the lengthwise divider on the inside and replace it with horizontal shelving.  Maybe one day.  Being the midst of the massive office makeover, honestly I was just too lazy to tackle it...  Especially after my massive blunder on it.

Sooooooo...

My idea was to paint her a gorgeous blue with some homemade chalk paint and then give her a little distressing.

Did that.  Didn't like it.  Too blah.

HOLY COW.
CAN YOU BELIEVE THE OFFICE USED TO LOOK LIKE THAT?????
So, then I got the wondrous idea to write a Bible verse down the entire front of it - in paint marker.  A great idea in theory - and probably a great idea if you execute it right.  Yeah, I didn't.

Poor Scott took an hour to tediously draw lines down the entire front of the cabinet.  As I've mentioned before, I have crooked eye syndrome and I can't even draw a straight line using a ruler.  Its a terrible affliction, believe me.

When he was done, I set to work writing Proverbs 31. It looked terrible.  I tried silver paint.  It was too light.  I tried black paint over the silver paint.  It was too dark.  I had absolutely RUINED the cabinet and I was HORRIFIED.

So, I decided to see if I could take a Magic Eraser to it.  Nope, didn't work.  409?  Nope.  Clorox?  Nope.  I wanted to cry.  Seriously.  I REALLY didn't want to paint over it again.  You have to understand that at the time I was primer and painting the entire office; Walls AND trim.  Not to mention three separate furniture makeover that were going INTO said office.  I really, really didn't want to have to start over.  Considering I'm not a pro at this and I've only been making over furniture for a little over 6 months, I was at my maximum stress threshold level.

Needless to say, I DON'T have pictures of the catastrophe.  If I did, I'd show ya.

As a last ditch effort, I took the sander to it.  You know how I REALLY like my chippy, shabby look:


As I sanded, I really started to like what I was seeing.

I sanded a little more...

And a little more...

And a little more.

Bit by bit, I realized that maybe screwing it up had been a good thing.  

And the more I sanded and distressed it, the more I liked it.


Or as my kids call it, "Making Everything Old"  LOL


And even though I decided to leave the vertical divider in place, it works great for the chicken wire, newspaper, and upholstery I store in it.


Of course, Scott good naturedly grumbled about all the time he had spent drawing all the lines, so I could write the verse straight only for me to sand most of it off.  LOL  But, it works.  And goes wonderfully with the office, even if it was a mistake.  :)


Don'tcha just love it when that happens?  ;)


Happy Good Friday, y'all...

XO,


Thursday, January 19, 2012

Putting The Office Together: Original Desk Makeover

One of the biggest things I second guessed myself about was how to fill up the space in front of my mantle.  I poured over magazines and the internet trying to get a good idea of something that would do the trick.  Enter my old desk.

The desk I used to use for my computer was a small, dainty lady's writing table that my father stripped and refinished.  My Dad had a thing for dark stains.  All the furniture I inherited has it.  And that means a lot of work changing it into something I can live with.


This was probably one of the easiest furniture makeovers I've ever done.  Literally one and a half hours start to finish.  I sanded it a little, just because it had a heavy coat of varnish.  Daddy loved his varnish too.  LOL!  I applied two coats of homemade chalk paint, then sanded lightly with a sanding block to smooth out the finish.  Next I distressed (that caused the blister on my thumb from rubbing LOL), waxed, and added a knob from one I had bought for this purpose a few months ago.  Done.


Instant gratification.


And instead of making the interior permanent by decoupaging a piece of scrap book paper to the inside of the drawer, I just used tape on the backside, so I can change it, if/when I get tired of it.


And I just love her legs...


Although I need to buy a darker wax and apply it, so those details pop.


It never ceases to amaze me what a little paint and time can do.  :)


What a great addition to the mantle.  Love it and so easy to do!  Aren't those the best projects?  :D


Wednesday, January 4, 2012

Pleather, Staples, and Footstools

Its a great morning from Iowa!  The caucus is OVER and my phone will finally stop its incessant ringing from robo-calls!  Thank goodness!  The last couple of days has driven me INSANE!  I won't say who my guy was, but let's just say I wasn't pleased with the results.  Boo.

Anyhoo...

A couple weeks before Christmas, I decided to tackle this hideously ugly footstool that I got from my favorite little thrift in Waverly, back in the first week of November.

I'm so glad that I have made the habit of doing Friday's Finds!  That way, I'm able to look back and see how much stuff cost me.  Lord knows it takes me so long to get around to doing things, I wind up forgetting!  I paid $7.50 for this little ugly pleather-covered monster.  What can I say?
I got a thing for great legs!  ;)

I decided to tackle the sucker, but ripping off the pleather was as far as I got.  Might have had something to do with the 50 decorative nails and 100 staples that was holding it all on.  And pleather tears and gets stuck under the staples.  Ugh.

This week, I decided to get the thing done already.  I was tired of looking at it sitting on my work table in the office.  And since I always take the easy route, I didn't replace any of the foam or filling in it.  I'm pretty sure that was horsehair in there.  Ew.  Gross, I know - but a heck of a lot cheaper!  Have you seen how much foam and batting costs???  No wonder its so expensive to have someone reupholster something!!!!

And since I'm an extreme cheap-skate when it comes to some things, I decided to make homemade chalk paint for the first time with this recipe shared on Facebook by Val from 2nd Essence.

1 and a 1/2 Cups Satin Latex Paint
1/2 Cup Plaster of Paris
1/2 Cup Hot Water
Mix Water/Plaster of Paris together, then add paint.  Mix well.

I painted her up with a couple of good coats of paint.  Man, that stuff dries lickety-split!  And better yet, no stripping or sanding.  AWESOMENESS!


Then I distressed (wonders of wonders, it only takes a damp rag and a little rubbing!) and waxed it with a finishing paste.

And then I set about pulling more staples that I had considered leaving and thought, "Nah...  Better not."  Scissors work wonders in a pinch.

Next, was figuring out how to cut the fabric and get it on without it looking like a complete idiot did it.  I bought a yard and a half of the fabric from J-A Fabs.  Plenty to do the footstool and the chair, with enough left over if I screwed up.

See all the staples???  Yeah.
Had to pull 'em all - after I had already pulled a hundred of them as it was!!!
Since I'm a complete novice at doing something like this, the toughest part was the corners and figuring out how to fold them in to give it a uniform finish.  And since I'm a total blond, I would forget corner to corner how I did the first one.  LOL!!!!

The bottom isn't pretty, put who's going to turn it over and inspect it?  If I had to do it all over again, I probably would have folded the edges over to give it a more finished appearance.  Hey, we're all about full disclosure here!  ;)  If you ever visit me, I will tackle you if you try to look underneath it!  HA!

All in all, I'm pretty pleased with how it turned out.  The fabric is a little heavy for the dainty-ness of the legs, but I was going for something that my kid or my cats couldn't destroy.  Its a good thing too.  Silly Marley figure it was her new cat bed, literally as soon as I finished taking the final pictures.  Actually, I kept having to shoo her away so I could even take the pictures!!  Why is it that my cats always find something I've worked on and must inspect it and then if they can, lay on it???  (I am NOT a cat person, I just keep them to deter the mice - and occasionally snuggle on my lap. LOL!)

And so you won't have to scroll up to see what she looked like before and because I'm helpful like that...


BEFORE:


AFTER:


Close-up of upholstery...

and legs.


Not too shabby for an amateur!  :P

And now on to the next partially started project...


See y'all tomorrow!  Make today a great one!  ;)


Wednesday, September 7, 2011

Bedroom End Table Reveal

I am on a roll, peeps!

My 2nd reveal of the week and its only Wednesday!  Yippee, ME!

Okay, so remember those hideously ugly end tables I got from Goodwill for $10 each?


Uggggggggglyyyyyy, no?

Tah-Dah!


^ For once, these pictures show the true green!  YAY!  ^


I haven't quite decided if I'm going to put the little grates back in.  I spray painted them silver and they actually look pretty good when I hold it up behind the side openings, but I'm still pretty iffy. What do you think?

These will go into the master bedroom, along with the rocking chair, when I start that little huge project.  First, I have to finish the diva's room and then start and finish Ian's chest of drawers, a table, and two twin beds for the boys' room.  I'm still on the hunt for two more twin beds on Craigslist, but I haven't found anything I like yet.

My idea for the the bedroom is cream and white bedding with gray and green accents.  The only things that will be green other than any bric-a-brac I find, will be the end tables and rocking chair.  I cannot wait to get started and I'm beginning to get impatient waiting on the diva's room.  I still can't figure out why certain places on the wall don't seem to be cured yet!

While I've been waiting, I've been working on the boys' room and picking up stuff here and there for our bedroom.  Check out these finds from Ebay. . .

**All prices include shipping costs**

I won the two vintage pillow cases at the center and the one to the left for $18.90.  The other four, plus the one pictured below I won for $30.96.  If you love vintage linens, I totally recommend shopping from scoutyboy1 on Ebay.  Her linens are in impeccable condition and come to you freshly laundered and starched crisply.  I got both of these sets through her and they were everything she said and more.  I almost hate to put them on my pillows.  They'll probably never look this good again!


At the same time I won the first pillow cases I had a bid on a vintage Bates Chenille Hobnail Bedspread.  Unfortunately, I lost that bid by a measly $0.50 because I wasn't able to be home to keep track of the bidding.  Errrrrrrrrr....

So, I immediately began searching for another one and made sure my max bid was high enough that I would win.  I won this vintage Bates Chenille Hobnail with a Fleur de Lis design in ivory for $45.01.  Its more of a creamy color than white, but it is gorgeous and in mint condition!  See for yourself. . .


 Love the fringe!

Yesterday, I won a white hand embroidered tablecloth for $10.07.  I'm going to repurpose it to go on the bed to add more layers and texture.  Needless to say, with all this white and ivory going on, the hubs is going to be taking a shower every night right before bed.  I don't care how exhausted he is!  And the kiddies are going to be banned from the bedroom!  I want our bedroom to be a sanctuary and that means its a kid-free zone - except when they're sick or have a nightmare, of course.  :)

Currently, I've got a bid in for a white Matelasse coverlet that I am determined to win.  It will complete the bedding that I have envisioned for our "new" room - well, except for a white hand crocheted tablecloth/bedspread, but those are pricey!  I've currently got 4 days and 1 hour left and I'm watching it like a hawk.    Totally fell in love with this!  Here are a couple of pics I snatched from Ebay:


Beautiful, is it not?  Now don't go on Ebay and run the price up on me now!  LOL


And all of it is going to look beautiful on this one of a kind brass bed from Brass Beds of Virginia that my parents had handcrafted and I inherited:


What a wonderful family heirloom piece this will be one day!


So, that's what I've been up to.  I can't wait until I get the upstairs bedrooms done, so I can start working on the downstairs.  Too bad I've probably got 2 months or better to go.  :(  Maybe I'll surprise myself and get it done sooner.  This beautiful weather we've been having is perfect for any home rehab!


Tomorrow?  Well, let's see...  Hopefully, I'll finish painting the boys nightstands that have been sitting with the primer on and ready to go for about a week now and if I'm feeling extremely ambitious, I'll begin work on Ian's chest of drawers and the twin beds.  


Who knows what tomorrow will bring?