Welcome To Our Little Big House On The Prairie


Showing posts with label reveal. Show all posts

Sunday, April 15, 2012

ASCP Fun... And a coffee table makeover.

For the rockin' peeps that follow moi on Facebook, you know that on Friday I posted this picture:


I received my very first delivery of ASCP product.  I can't tell you how long I have hemmed and hawed over spending that kind of money, but finally I just did it.  And I am sooooo glad I did.  :)

At first, I was super scared to use it.  I stared at it for a couple of hours and googled the heck out of ASCP technique.  I should have just bought Mrs. Sloan's book.  Its one thing to waste cheap paint on a screw up.  Its a completely different thing to mess up with really expensive paint.  Know what I'm sayin'?

So, after spending lots of time on the wide world web, I decided I better get to it, so I painted a chandy.  I'm saving that reveal for later.  Gotta hang it.  ;)  (I'm such a TEASE.)

Its beautiful, beautiful paint even if it does make a GINORMOUS mess (Think: You need to wear a mask) when you sand it, but my, oh my...  It feels like silk.  Butter.  Cashmere.  Oh, so very soft.  And I also noticed my hands weren't as dried out as they are when I use latex paint.  I'm not sure I can ever go back to homemade, unless I simply can't afford the ASCP.

Next, I decided to tackle a coffee table that I've had for about 6 months.

Back in October, I found this barn wood coffee table on Craigslist. Initially, the lady had it listed for thirty dollars, but I kept watch and after a couple of weeks, she dropped it to $15.00.  SOLD!


Now granted, when I saw it online I thought the bottom was black. Nope.  Purple.  Maroon.  Whatever.  It was fugly.  Nothing that paint couldn't fix though.  The barn wood on top was fantastic and the legs, not matching, look like either old table legs or porch posts.  I love that they don't match, although I would have put the matching ones on the diagonal from each other, instead of on the same side.  Scott and I tried to take it apart.  Yeah.  I can say this for the person who made it:  Bomb proof.


I stripped and sanded away at her for a couple of days and finally gave up trying to get that hideous maroon off.  It had pretty much dyed the wood and was in all the crevices.  So, I just left her in the living room and promised she would be the first thing I tackled if I ever bought ASCP.


At Christmas.
So she was.


Anyway...  Blah, blah, blah.


Here she is after.


The top is done with Old White - which for people that have never ordered it, is a little more Cream than I would have liked.  I should have ordered the Pure White.  The bottom is actually Calypso Sky and is an acrylic, that I mixed with the Old White.  It worked beautifully.  All the hype about ASCP lasting forever is true.  I painted the entire base, plus the underneath of the base that you can't see, using about a cup.  No kidding.

No staging for pictures.
The dining room is in progress and all my dining room crap is in the living room  :(

Unfortunately, my little stinker ran his trucks over it (be sure to let the wax cure for twenty four hours MINIMUM), so it scratched up the top a little.  GAH!  I guess it being tucked in the corner of the dining room wasn't a hint.  Oh well, it does make a good road, I guess.  Even if I'm going to have to re-do it.  ARGH.


I pretty much did no distressing on the legs and waxed it (as directed by my beautiful bloggy friends on Facebook) with the light wax first, then the dark, then again with the light.  Worked like a charm.  And that dark wax is going to last me FOR-EVAH.


See, even Lucy Kitty likes it.  :)

Not too shabby for my first use of it.  And with a fifteen dolla (HOLLA!) piece of furniture, it was a great piece to try it out on.  Now, for the big boy...  The china cabinet.  Fingers y'all crossed y'all!


XOXO,


Wednesday, April 11, 2012

Dining Room Table: Reveal


I apologize in advance for those of you who voted for the book shelves to be done first, instead of the dining room table.  Unfortunately, the book shelves require Scott's know-how and the dining room table did not.  I'm still waiting on the trim for the book shelves.  I really should learn how to operate power tools.  LOL

Anyhoo...

The dining room table was my Mom and Dad's.  After their divorce, my Dad got the dining room table and when he died, I got it.  My Dad was all about wood, like most typical men.  Stained wood furnishings were the rule of thumb in his house.  Needless to say, I inherited quite a bit of paintable furniture.  He's probably rolling over in his grave, somewhere in Delaware Bay.  Sorry Daddy, but the wood has got to go.  I know you would still love me anyway. :D

Okay, so on that morbid note, here's the before pic taken shortly after we moved into our house.

I still can't believe that this was the office!

After five years of basically using it from everything from meals to homework to school projects to crafts, it was looking mighty rough.  When I questioned my mom as to why in the world they bought a maple table because its such a soft wood, she said, "Because it was on sale."  Oooookay then.

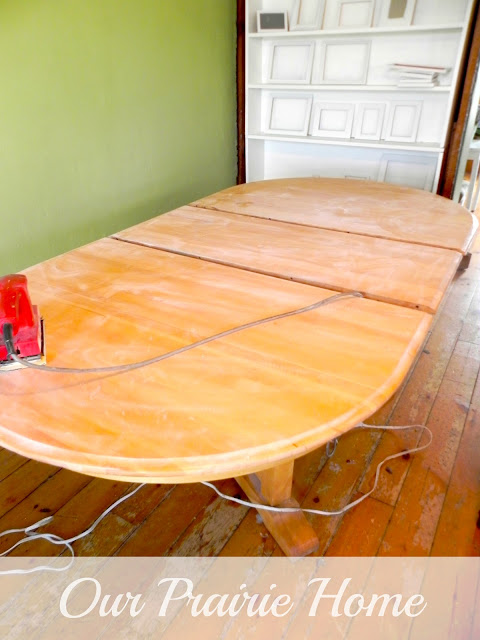
So, I wiped her down and did some light sanding for prep:


And the same with the chairs:


I had to sand a little heavier on the edges of the tops and sides because they were knicked and dinged to death.

Using my trusty chalk paint recipe, I painted the top with "Cotton Balls" by Benjamin Moore and the bottom, my favorite color ever...  "Covington Blue" from the Benjamin Moore Historical Series.  Its a blue without being a blah blue.  Depending on the light, it can take on almost an aqua-y feel without being aqua.  Its a lovely color.


 I debated on going all white for quite some time, but as I usually do, I went off of what I am drawn to in my home decor magazines.  And its always the tables that the bases are painted blue.  Every.  Time.


And you know me with my "too much white" thing going on.  And of course I had to "make it look old".  ;)


And I can tell you its no fun trying to reveal a piece of furniture and get a good picture of it when the room is still in demo stage.  LOL


 So, just try to ignore the half painted book shelf with its missing trim and the destroyed wood floors that we've finally decided just to paint.  Obviously having someone come in and re-do them just ain't going to work.  The pine is just too soft to withstand our foot traffic and I'm not going to throw another $900.00 out the window for the floors in the office and the dining room again, only to have them look like they do now... Again.  Contractor horror stories, anyone?


I am still amazed at how much going lighter has made a difference in the atmosphere of our home.  Its so much more cheerful and relaxing.  

My goal is to get a bench to go on the wall side of the table, so it can be pushed back against the wall when not in use.  For now, painting the two oak pressback chairs to match works.  Plus, a bench will seat three of my rugrats, making room for everyone at the table.

I can't wait to get the wainscoting done, so I can hang that gorgeous mirror on the wall above the table.  Scott?  Are you reading this???  ;)


Next...

My Dad's rocking chair or the china hutch.  I haven't decided yet.  Check out my facebook page for new uploads of the china hutch.  We picked her up last night.  :D

XO,

Linking up to:

Monday, January 16, 2012

Office Makeover Madness: D.O.N.E {The Reveal}

I've moved!

**********
You can find more recent Our Prairie Home makeovers and furniture projects HERE.


{I apologize in advance for the huge number of pictures in this post.  Just wanted to share the journey with you.}

It is finished.

Finally.

And I have the dry, chapped hands and blisters to prove it...

OUCH!
Despite famine, pestilence, floods, fire and brimstone...  Well, actually it was just the flu making its rounds around our house this weekend, but it sure felt like life was determined to get in the way.  Never underestimate the power of your own determination!  I am so glad its over with and I'm sure my family is too.  They were such troupers this week, you know, with cereal for dinner and one pan meals, the house being a wreck, me falling behind on laundry...  I owe them a clean house and a good meal.  But I'll get to that.  I'm going to reveal our office makeover...  At last.  Thanks for being so patient with me and so very, very supportive!  I couldn't have done it without you!  :)

And I am so thankful to Rachael at Lovely Crafty Home for the kick in the bootay I needed!  Click the link below to get to her fantastic page!

Lovely Crafty Home


This is how the office used to be decorated, when we first moved into the house...


And then it morphed into this...


And then twelve days ago, I pulled everything out and attempted an Extreme Makeover:  Our Prairie Home Edition

West Wall

North Wall

South Wall

East Wall
Because the northeast corner looked like this...


And so, here it is.  My freshly painted, newly organized, totally lovin' it office...

West Wall


Northeast Corner

South Wall


I don't have a picture of the east wall straight on.  Why?  To be honest, its because my parlor/dining room is a complete disaster still.  LOL!  Man, what a ride!

So, that's it.  I really love it.  Every single piece in this room is a personal favorite, so I am surrounded by things that I love and inspire me.  Every item was either a thrift store find, an antique store find, something I already had, or something I made - with the exception of the desk chair pillow, the blue-green tray, bird, and reproduction mercury glass on the mantle.  Those I scooped up for a steal at T.J. Maxx.  All the furnishings I re-furnished myself this week, except for the desk chair and chippy cupboard.  I left those as is.  All in all...  Not too bad for a girl that up until last June had never even attempted to refinish furniture or do any kind of decorating at all.  And my house looked like it!  ;)

And the best part of it all?  I did it all myself!  No man help.  LOL!

So, now its time to clean the rest of the house that has been totally destroyed over the last twelve days...  AND...  To start looking at the dining room.  But I think I'll give myself a breather for a week or so before I start that.  I am TIRED.

This week, I'll be showing a lot of befores and afters of some of the  items I refinished for this room.  Be sure to check back and see what a little bit of work can do!  :D

Have a great day, y'all!


Linking up to:

Funky Junk Interiors SNS 151

Sunday, October 9, 2011

Buffet Reveal

On Thursday, I told y'all all about my blunders with the "blasted" buffet.  First of all, I have to send out a huge "Thank you!!" to Shari from Turnstyle Vogue Design and Styling for giving me a much needed "subtle" challenge (works on me every time) and kick in the boo-tay to get this buffet completed.  I probably would have talked myself out of ever tackling it, if she hadn't given me a little nudge.

A little background on this particular piece...

I had initially found a buffet (late 20s) that I adored on Craigslist.  Unfortunately, it was also 2 1/2 hours away and the hubs vetoed it.    The buffet I wanted was a measly $20 because it had some veneer damage (very similar to the one you just redid, Shari), but taking our one ton Dodge to get it would have cost quite a bit in fuel (This was back when gas was hovering around $3.75/gal.)  The hubs reasoned that I could spend $100 on one closer and still spend less than I would spend getting the one I wanted.  Made total sense.  So, that night I sat down on Craigslist and found one that was being sold for exactly $100 and was two hours closer.

The seller did not have pictures posted and I have to admit that I was really disappointed when I got there.  It was definitely not what I had in pictured when he told me it was late 1920s, early 1930s.  Obviously, it was no where close to that old.  The veneer was literally buckling off in huge waves.  It was pitted, chipped, and scratched.  Hinges were falling off due to stripped screw holes.  Knobs were broken off.  Basically the only thing it had going for it was that it had really good bones.  It will be the first and last time I ever go to buy a piece of furniture to refurbish that doesn't have a picture with the ad.

These pictures really don't convey how bad of shape it was in...


Well, being I had just drove 30 minutes and I was determined to have a buffet, I bought it.  I did talk him down to $60 from his original asking price once I pointed out all of it's issues.  My bull headed nature does tend to get me in trouble sometimes, but its also that nature that drives me to tackle things and get them done. Or, at least that's what I tell myself.  ;)


By the time I got home, I knew I had really bitten off more than I thought I could chew.  Of course, I wasn't about to admit that to anyone (Anyone = The Hubs).  So, once we moved it on to the back porch, it has sat there mocking me every time I've come in the back door - for the last 2 months.

Finally, last Wednesday I decided I was going to attack the beast.  I didn't know how I was going to do it, but I was going to get it done. I knew that there was no way in the world the hubs would let me buy another piece of furniture of that size to refurbish if I didn't get that one done.  Plus, Shari's little challenge of "Looks great!  Now how 'bout that buffet?!  Lol." on Wednesday's foyer table reveal really made me decide to tackle the stinkin' thing.  ;)

So, I spent all day Wednesday taking off all the veneer.  Wouldn't you know that the veneer on the doors and drawers were all able to be pulled off by hand, while the top of it fought me like no tomorrow.


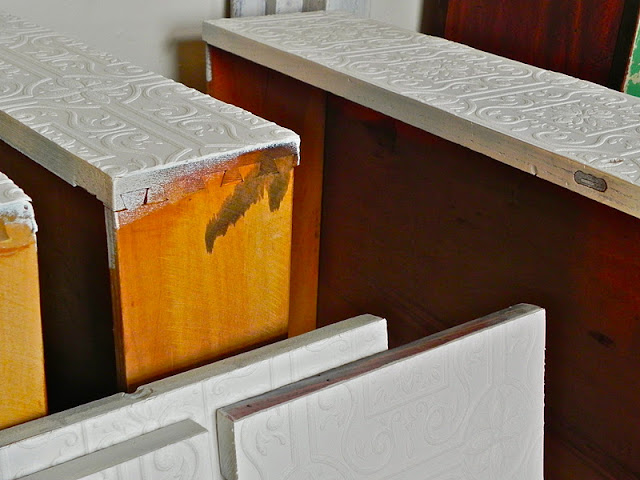
  I hated that buffet.  Thursday was spent sanding the little bugger and filling in all the holes and gouges with wood putty.And that evening was spent with the hubs applying paintable wall paper to her doors and drawers.  THANK YOU, DEAR!  Friday morning, I did the finish sanding and went shopping for the paint and knobs.  


  By Friday afternoon, I had her primed and sitting with fans blowing on her from every direction (Patience is not one of my virtues)...


And by midnight I had one coat of paint on...


Saturday morning, I touched up all the spots where I could see the primer through the paint and let that sit all day.  I didn't want heavy coverage since I knew I was going to add some distressing.  By that evening, I was ready to start glazing. (Sorry I didn't get pictures of that part.  I was really intent on getting that far and not screwing the entire thing up.)

Once I got the glaze on the first door, I realized that the "Stone Slate" I wanted to use was too light.  It didn't make the detailing pop like I had envisioned.  Thankfully, I had some "Tall Cattail" on hand and it totally rocked!  Thank the Lord for small favors!  Unfortunately, the glaze really clashed with the knobs I had picked out.  Boo!  After putting on three coats of polycrylic over a nine hour time period (I swear I hardly slept), all she needed was different knobs.

This brings us to Sunday...  As we headed to Noah's last football game of the season, we swung into Menard's where I agonized for a good 45 minutes over the perfect knobs.  For once, the hubs was the one tapping his foot impatiently while I declared one set of knobs perfect, before putting them back when I spied something else.  LOL!  I think I finally decided on the 1000th set of knobs that I picked up after picking up a hundred other kinds and then putting them back.  I'm sure I looked like I had some kind of split personality issue going on:  

"I've found them!"  

"No, I haven't."  

"Oh!  These are it!"  

"No, they're not."

"Finally!  These are it."

"Wait!  What about these?"

After suffering through an hour of football where my son's team got completely pounded by a team that broke every YSF rule out there - and watching as my son got clotheslined repeatedly causing him to come off the field once when he couldn't breath due to a blow to the neck (Ever wanted to hurt someone else's kid????) - we finally came home and put the finishing touches on my beauty - namely, putting in the drawers, putting on the doors, and adding the knobs.

That's right.  I said, beauty.  Did you catch that?  I tamed the beast!  :)

And now donning a lovely "Covington Blue" by Benjamin Moore and glazed with "Tall Cattail",  please allow me the pleasure of introducing you to my beautiful new-to-me buffet...


And I got the hugest compliment ever from the hubs...

"Would you consider selling it?"

Ummmm...  He got a "No Way!" accompanied with a "Have you lost your ever-lovin' mind?" look.  LOL!

So, here's a quick recap:


Now I have my husband's full support in redoing any furniture that I want.  :)  He's even talking about accompanying me to some auctions.   Annnnnndddddd...  Turning the barn into a workshop where I can work all through the winter!!!  SCORE!


I must say that the pictures don't even begin to do her justice.  I love how she's distressed and aged in all the right places.  I adore her color.  And the knobs are just the right touch.  I chose right!  Its funny how one piece of furniture can motivate you to complete an entire room.  Now I've got to get a move on to get the diva's room done, so I can start working on the dining room (How many times have I said that in 3 months???).  She's just too pretty in that shabby (not in a good way) room.


I've linked up to: