Welcome To Our Little Big House On The Prairie


Showing posts with label office. Show all posts

Friday, April 6, 2012

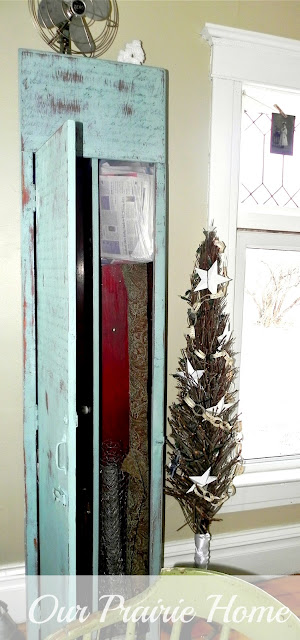
Pine Chimney Cabinet

Back in January when I revealed my office makeover, I told you I would tell you about the fiasco that was my pine chimney cabinet.  The best makeover stories are the screw-ups with the happy ending, I think.

A chimney cabinet or cupboard was used during the 1800's in the small narrow space in between the chimney and the wall.  Mostly used for utility storage, it was a great use of a small space.  I have no idea how old the one I found in the "Mart of Doom" (you can read while I call it that HERE) is, but it has definitely seen some wear and tear.

I managed to talk good ol' Gene down to $50.00 from his $75.00  asking price, so at least I saved a wee bit on it.


Probably still paid too much for it, but what-ev.  Serves its purpose just fine.


It was really disgustingly gross on the inside - as are most things from the "Mart of Doom", but it cleaned up really well.

Initially, my idea was to remove the lengthwise divider on the inside and replace it with horizontal shelving.  Maybe one day.  Being the midst of the massive office makeover, honestly I was just too lazy to tackle it...  Especially after my massive blunder on it.

Sooooooo...

My idea was to paint her a gorgeous blue with some homemade chalk paint and then give her a little distressing.

Did that.  Didn't like it.  Too blah.

HOLY COW.
CAN YOU BELIEVE THE OFFICE USED TO LOOK LIKE THAT?????
So, then I got the wondrous idea to write a Bible verse down the entire front of it - in paint marker.  A great idea in theory - and probably a great idea if you execute it right.  Yeah, I didn't.

Poor Scott took an hour to tediously draw lines down the entire front of the cabinet.  As I've mentioned before, I have crooked eye syndrome and I can't even draw a straight line using a ruler.  Its a terrible affliction, believe me.

When he was done, I set to work writing Proverbs 31. It looked terrible.  I tried silver paint.  It was too light.  I tried black paint over the silver paint.  It was too dark.  I had absolutely RUINED the cabinet and I was HORRIFIED.

So, I decided to see if I could take a Magic Eraser to it.  Nope, didn't work.  409?  Nope.  Clorox?  Nope.  I wanted to cry.  Seriously.  I REALLY didn't want to paint over it again.  You have to understand that at the time I was primer and painting the entire office; Walls AND trim.  Not to mention three separate furniture makeover that were going INTO said office.  I really, really didn't want to have to start over.  Considering I'm not a pro at this and I've only been making over furniture for a little over 6 months, I was at my maximum stress threshold level.

Needless to say, I DON'T have pictures of the catastrophe.  If I did, I'd show ya.

As a last ditch effort, I took the sander to it.  You know how I REALLY like my chippy, shabby look:


As I sanded, I really started to like what I was seeing.

I sanded a little more...

And a little more...

And a little more.

Bit by bit, I realized that maybe screwing it up had been a good thing.  

And the more I sanded and distressed it, the more I liked it.


Or as my kids call it, "Making Everything Old"  LOL


And even though I decided to leave the vertical divider in place, it works great for the chicken wire, newspaper, and upholstery I store in it.


Of course, Scott good naturedly grumbled about all the time he had spent drawing all the lines, so I could write the verse straight only for me to sand most of it off.  LOL  But, it works.  And goes wonderfully with the office, even if it was a mistake.  :)


Don'tcha just love it when that happens?  ;)


Happy Good Friday, y'all...

XO,


Thursday, January 19, 2012

Putting The Office Together: Original Desk Makeover

One of the biggest things I second guessed myself about was how to fill up the space in front of my mantle.  I poured over magazines and the internet trying to get a good idea of something that would do the trick.  Enter my old desk.

The desk I used to use for my computer was a small, dainty lady's writing table that my father stripped and refinished.  My Dad had a thing for dark stains.  All the furniture I inherited has it.  And that means a lot of work changing it into something I can live with.


This was probably one of the easiest furniture makeovers I've ever done.  Literally one and a half hours start to finish.  I sanded it a little, just because it had a heavy coat of varnish.  Daddy loved his varnish too.  LOL!  I applied two coats of homemade chalk paint, then sanded lightly with a sanding block to smooth out the finish.  Next I distressed (that caused the blister on my thumb from rubbing LOL), waxed, and added a knob from one I had bought for this purpose a few months ago.  Done.


Instant gratification.


And instead of making the interior permanent by decoupaging a piece of scrap book paper to the inside of the drawer, I just used tape on the backside, so I can change it, if/when I get tired of it.


And I just love her legs...


Although I need to buy a darker wax and apply it, so those details pop.


It never ceases to amaze me what a little paint and time can do.  :)


What a great addition to the mantle.  Love it and so easy to do!  Aren't those the best projects?  :D


Wednesday, January 18, 2012

Putting The Office Together: Dumpy Desk Makeover

Who knew when I found this little baby in the "Mart of Doom" that I would wind up liking her as much as I do.


To say she had some issues would be an understatement.  Check out the rust from the nails that were holding this on...


Gotta love the dirty stained fiberboard with quarter round to trim it out.  I found her in a darkened corner covered in junk and surrounded by tons of stuff.  I almost passed her by, but then I asked for a flash light.

After looking her over real good, even crawling on the floor to look underneath to figure out what in the heck was going on with the top, I figured the $35.00 asking price wasn't too bad.  Not great, but not bad either.

So, when I got her home, I pried off the fiberboard and trim with a spatula.  Remember that?  LOL!  You know, because I couldn't find one of my three hammers in my crap pile in the office?  LOL!  Regardless, it popped right off.  I decided to leave the base as is because I liked her age showing.  I just cleaned her up real good with some Krud Kutter.  You should have seen the filth that ran off of her.  N-A-S-T-Y!!  I must have dumped the bowl 5 or 6 times.  Then I sanded the living daylights out of the top and filled in the worst of the gouges with wood filler, while leaving some for character...


and then I sanded some more.

I primed her up but good, and then slapped a coat of chalk board white paint on the top.  Initially, I thought I'd dry brush her with my favorite paint color, but I just wasn't feeling it...


So, I re-painted it white and then glazed it with my go-to paint: Tall Cattail.  Better, but not great.

{Somehow I skipped a picture of this step.}

I thought about decoupaging the top with scrap book paper, but I didn't have enough of one kind of sheet.  Then I thought about book or hymnal pages, but I just didn't know.  So, what to do when you're at a crossroads?  Let it be.  I left her overnight, while I slept on it.  I've learned in the last 7 months that its never a good idea to force it.  You always wind up hating what you did just to say it's done.  The idea will come when its damn good and ready and not a moment before.  ;)

I was flipping through my scrapbook paper the next morning and I came across this one...


And I kept coming back to it.  Alas, I only had 2 sheets.  :(  And I really liked it.

So, what'd I do?

Cut 'em all out.  It only took about an hour.

Then I decoupaged them on at random intervals.


And then poly'd the top with two coats and decoupaged inside the drawer with scrapbook paper, as well...


I was quite satisfied.

So, this is the before...


And after...


When paired with this chair from an antique store for $35...


and the DIY chalk board for $12 that used to look like this...


and now looks like this...

The top printable you can find from the Tip Junkie.
For some reason, the link would not work.  Just search craft room printables.
The bottom printable, I just made myself in Mac iWork Pages.
Put it all together and it fits me just perfectly, just as I had hoped (like really, really hoped that I hadn't made a huge mistake when I bought it all.  LOL)...


So for $70, I had a whole new office set up.

I think the thing I have fallen in love most with in this journey of makeovers and refurnishing, is that when you refurb something, it is one of a kind.  No one else will have anything just like it.  And you can make it to suite your taste.  Plus, you're saving furniture from landfills and giving it a new lease on life.  Stuff just isn't made like it used to be and with a little money, a little work, and some effort, you can have better quality items for a fraction of the cost.  BONUS!

I know there are some thrifters that would think that I paid too much for both pieces, but you can't even think about buying a solid wood desk for that price nowadays!  Heck, you can't even buy a laminate desk for that!  ;)  And my old desk got a much needed makeover.  But, we'll save that for tomorrow.

Until then y'all...  Have an awesome day!


Tuesday, January 17, 2012

Putting The Office Together: Chippy Cupboard

The biggest hurdle in the office makeover was deciding on the palette I wanted to use.  I knew the colors had to flow from room to room, so whatever I decided to go with, I knew I had to want those colors, or similar ones for the rest of the rooms in the downstairs.  To be honest, I had no clue where to start.  Well, I was reading a magazine a few weeks back and one thing that stuck with me was to take your cues from an item that speaks to you and build your idea  from there.  

Some people get their color scheme ideas from fabric or build a mood board.  Me?  I got my idea from this...


I have always loved the white, blue, green, and beige of this picture.  It soothes me.  And makes me think of my home.

One of the last items I purchased for our office was this chippy old cupboard.  I loved the peeling paint and BONUS!  Tons of storage!


Yes, the wood on the doors are cracked and warped.  Yes, the paint is peeling.  It has some stains on the shelves from paint storage, but that wasn't a big deal.  I'm sure I'll be adding my own, soon enough.  And when I get that workshop out in the barn that I want and it can be the display piece that I eventually want it to be... Paint, Scrapbook Paper, and Mod Podge work wonders.  Its completely perfect...  For me.  The doors shut and the latches work.  What's not to love?  For $115.00, I wasn't complaining.  Sure, I could have found one cheaper somewhere else, but it would take months of looking.  I didn't have even have one month.  And how often is it that you find exactly  what you were picturing in your head for a certain space?  For me?  Not very often.  ;)

The storage capacity is insane.  Even I was surprised how much I could stash neatly organize in there.


Okay, let's break the items down by cost, top to bottom.


I love white plates and I love picture frames.  There's just something about their simplicity.  They're unpretentious, yet pack a big decorating punch.  Love them, love them!  The two plates on each side were $1.00 each from Goodwill.  The center platter I found at Trinkets back in November for $2.00.  The easels?  Goodwill.  $1.00 each.  They were black and then got the chalk paint treatment.  That stuff will stick to anything!  The two frames on each end I found at the Lil Brick School House in New Hampton for $5.00 each.  They were gold.  The little round frame?  0.75 at Trinkets.  It was gold too.  The middle square frame used to house a picture of my Dad when he was about Landon's age.  Another paint job.  The small square frame?  $1.00 at Country Collections in Hampton.  Paint job.  And the top of a newel post?  $0.50 at Schunk's Junque in Clarksville.  It was varnished wood.  Again, chalk paint.  Love that stuff!


One of my favorite items is this meat grinder that I found at my in-law's several months ago.  Its so industrial and is just neat to look at.  I think it'll always have a home in our office.

A big thing I've learned is to never underestimate the power of paint or upcycling an object for another purpose.


The glass vessel holding my twine and raffia?  That came in the lantern that I used for my Christmas decor last month.  The glass candy containers on the top shelf?  1.00 each.  The glass bathroom accessory, another buck.  I found them all at Goodwill.  The small glass vessels on the 2nd shelf?  $0.75 each at Trinkets.

And check this out...  The white canisters?


$1.00 each in the Wal-Mart Christmas Clearance aisle.  They'll eventually get labels, but I haven't had the time and to be honest, the energy to do them yet.

The baskets?


Primer and spray paint.  Yep.  They were gold.  Christmas clearance.  $1.00 each.  And just to be sure I wasn't getting the good ol' Walmart fool ya on the "deal", I went to the florist section.  Wicker baskets of the same design and style, but in black and natural, were selling for $12.97.  Go figure.

And the bottom shelf:


All my painting supplies.  I told Scott that if we ever had a fire, the house would blow up.  I really need to get that outdoor workshop.  And I also realized I have a slight addiction to glaze.  Do you think 6 full quarts is enough?  LOL!

So, my whole stash of stuff, which up until this point had been relegated to stashes around the house in bags, boxes, and laundry  baskets, as well as piled up in the northwest corner of the office all look nice, neat, and orderly - Dare I say somewhat organized - in our nifty chippy cupboard...


The trick will be keeping it that way!

Until tomorrow, y'all...  I'll be talking about that corner that holds my desk.  Be sure to check back!  :D


Monday, January 16, 2012

Office Makeover Madness: D.O.N.E {The Reveal}

I've moved!

**********
You can find more recent Our Prairie Home makeovers and furniture projects HERE.


{I apologize in advance for the huge number of pictures in this post.  Just wanted to share the journey with you.}

It is finished.

Finally.

And I have the dry, chapped hands and blisters to prove it...

OUCH!
Despite famine, pestilence, floods, fire and brimstone...  Well, actually it was just the flu making its rounds around our house this weekend, but it sure felt like life was determined to get in the way.  Never underestimate the power of your own determination!  I am so glad its over with and I'm sure my family is too.  They were such troupers this week, you know, with cereal for dinner and one pan meals, the house being a wreck, me falling behind on laundry...  I owe them a clean house and a good meal.  But I'll get to that.  I'm going to reveal our office makeover...  At last.  Thanks for being so patient with me and so very, very supportive!  I couldn't have done it without you!  :)

And I am so thankful to Rachael at Lovely Crafty Home for the kick in the bootay I needed!  Click the link below to get to her fantastic page!

Lovely Crafty Home


This is how the office used to be decorated, when we first moved into the house...


And then it morphed into this...


And then twelve days ago, I pulled everything out and attempted an Extreme Makeover:  Our Prairie Home Edition

West Wall

North Wall

South Wall

East Wall
Because the northeast corner looked like this...


And so, here it is.  My freshly painted, newly organized, totally lovin' it office...

West Wall


Northeast Corner

South Wall


I don't have a picture of the east wall straight on.  Why?  To be honest, its because my parlor/dining room is a complete disaster still.  LOL!  Man, what a ride!

So, that's it.  I really love it.  Every single piece in this room is a personal favorite, so I am surrounded by things that I love and inspire me.  Every item was either a thrift store find, an antique store find, something I already had, or something I made - with the exception of the desk chair pillow, the blue-green tray, bird, and reproduction mercury glass on the mantle.  Those I scooped up for a steal at T.J. Maxx.  All the furnishings I re-furnished myself this week, except for the desk chair and chippy cupboard.  I left those as is.  All in all...  Not too bad for a girl that up until last June had never even attempted to refinish furniture or do any kind of decorating at all.  And my house looked like it!  ;)

And the best part of it all?  I did it all myself!  No man help.  LOL!

So, now its time to clean the rest of the house that has been totally destroyed over the last twelve days...  AND...  To start looking at the dining room.  But I think I'll give myself a breather for a week or so before I start that.  I am TIRED.

This week, I'll be showing a lot of befores and afters of some of the  items I refinished for this room.  Be sure to check back and see what a little bit of work can do!  :D

Have a great day, y'all!


Linking up to:

Funky Junk Interiors SNS 151