

No, that's not Swedish or any of those other languages that when translated to English looks uber weird and makes no sense... This is my "Holy Cow I Didn't Know I Could Do It Myself!" Wreath. Otherwise known as "If I Had Known I Could Do Something Like This I Could Have Saved A Ton Of Money Over The Years!" Wreath.
I mean, seriously. Do you know how many times I have paid $40 or more for a wreath?! I've got a Summer Wreath, a Spring Wreath, a Fall Wreath, a Christmas Wreath, a Just-Because-I-Wanted-A-Wreath Wreath, and not to mention the ones that have fallen apart over the years. And maybe its just me, but none of them were this cool.
And how much do I have into this wreath? Let's see...
Grapevine Wreath - $5.99
Spray Primer - $3.99
White Spray Paint - $3.59
Pressboard Letter: $1.99
Scrapbooking Paper: $1.50
Pressboard Letter: $1.99
Scrapbooking Paper: $1.50
Felt - $3.00
2 Spools of Ribbon: $6.00
2 Spools of Ribbon: $6.00
Total Cost: $26.06
I'll say it again: "HOLY COW!"
I initially got my inspiration from a blog that I love and follow pretty faithfully...
I saw this wreath on Thrifty Decor Chick:

That she found HERE.
This was her take on it:

Way cool, huh?
Well, I have neither the time, nor the patience to attempt to cover a whole entire wreath in felt roses, (especially since I've never even attempted to make felt roses) but I thought, "WOW! I could possibly do that on a smaller scale without beating my head up against a wall!"
So yesterday when I went to Hobby Lobby, I was armed with a list of materials for a few different crafty ideas I wanted to try. This wreath was one of them. Since I'm such a newbie to the wonderful world of DIY, it probably cost me a lot more than any other future crafty projects will because (yes, I'm admitting it) I had to buy a *GASP* glue gun. And glue sticks. And Mod Podge. Yes, I'm am totally admitting to the whole crafting world that I did not, until yesterday, possess a glue gun, glue sticks, or Mod Podge. But I consider that money well spent when I think of all the yumminess (hmmm... That must actually be a word because my spell check didn't underline it. How about that?) I'm going to get up to.
1. First I primed and painted the grapevine wreath and the pressboard letter.

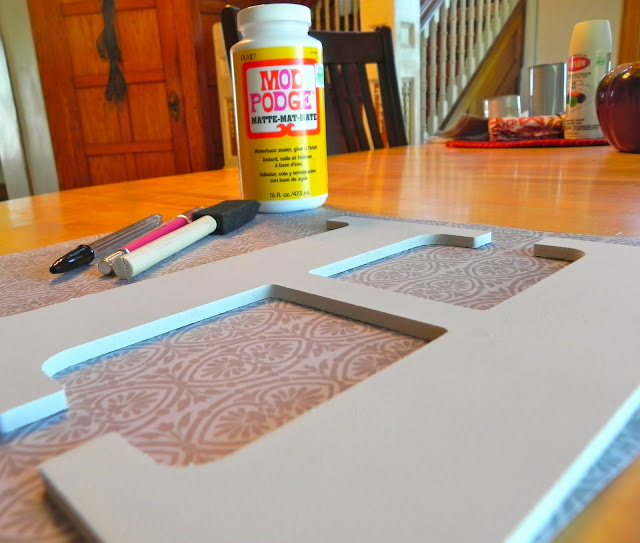
2. Then I traced my letter onto my scrapbooking paper.


Here they are all cut out:


H. Then, you'll take the end of your pig tail and adhere it with a little dab of glue.

And before you know it, you'll be done!


Without further ado, here's the materials you need:
Grapevine Wreath
Spray Primer
White Spray Paint
Glue Gun
Exacto Knife
Mod Podge
Pressboard Letter
Scrapbook Paper
10 Sheets of Felt
A Spool (or two) of Ribbon

It took no time for the letter to dry in the sun, and while I was waiting on my wreath to dry, I got started on the decorations I planned to use.

2. Then I traced my letter onto my scrapbooking paper.
* Don't Do This *

* Or This *

See, I make the dumb mistakes and tell you about it, so you won't!
Duh.
Duh.
(Good thing I bought 3 sheets of paper!)
* Do This *
Outline your letter on the BACK of your scrapbooking paper.


3. Apply the Mod Podge to the letter first and then lay your cut-out onto your letter. Smooth out any bubbles or creases with a credit card. I used the Matte finish. When that has dried, flip your letter over and trim off any paper that overlaps the edges. Apply the Mod Podge to the entire surface of the letter. You don't have to do this, but I like the way the finish looks.

4. After the Mod Podge dries completely, sand the edges of your letter off to give it a more finished look.
5. Next step: Making the felt roses... (For all the Craft Goddesses out there who know how to do this, please skip this section. Its for those of us novices who have no idea that making felt roses is so easy!)
A. Gather any circular items from your home to trace your circles. You can do it free hand, but since I can't draw a circle if a gun was held to my head, I prefer to trace something.

I used a top from a pitcher, CD, Bowl, seasoning cap, and a ribbon spool.
B. Make your circles. I didn't really pay attention to how many I had of each size. I just randomly grabbed an object and traced whatever would fit on the piece of felt.

Its a good idea to use pen/pencil that's a close match to the color of your felt. Although I have no idea what you're supposed to use for white, so I just used a pencil.
C. Cut out all of your circles.


D. Cut all your circles into little pig tails, by starting at the outside edge and working your way to the center while turning the piece of felt. You can either discard the little circle that is left or keep them for later use. If you want a looser flower, but don't want a small hole to show at the center, you can glue the leftover circles to the back of the rose to camouflage it. I did that a few times.

Here they are all cut out:

Since I'm kind of OCD about this kind of thing, I work like I'm in a factory line. Trace all circles, cut out all the circles, cut the spirals, make the roses. You do whatever works for you.
E. To form the roses, I found it easiest to start at the outside end and fold the edge in, like so before I start to roll the felt...

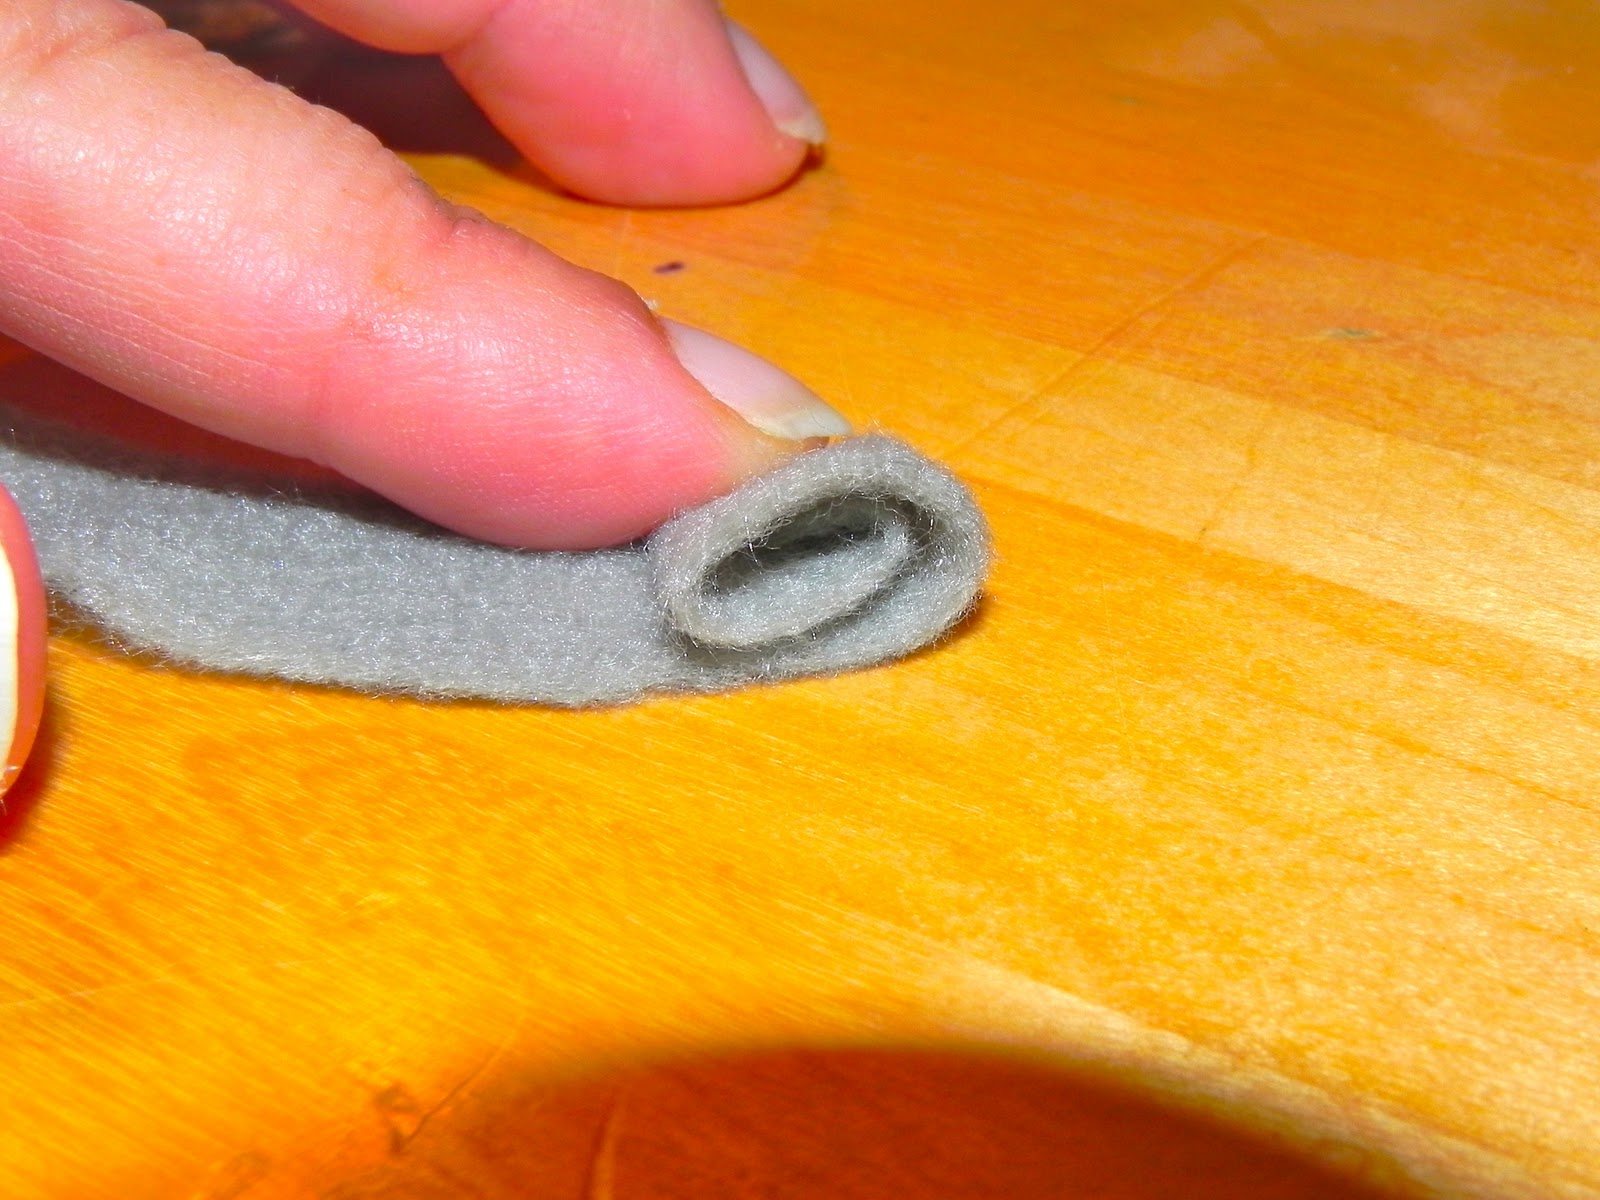
Please excuse the lack of a manicure.
I have neither the time nor inclination to do so, since they constantly get ruined by washing dishes, doing laundry, and inevitably get broken by playing catch with the boys.
F. Once you do that, then you can begin rolling the felt, keeping the inside edge in line. The first few times were clumsy, but it didn't take very long to get the hang of it. You'll find the technique that works for you. Some people keep the felt on the table and roll it up. I hold the felt in my left hand, while wrapping it with my right.
G. When you reach the end of the spiral, you'll have a rose that looks like this. Believe me, I first few times the roses looked nothing like that and I had to walk away from it for a while. I'm not the most artistically inclined person. But I persevered and it didn't take long before I had a perfect flower.

H. Then, you'll take the end of your pig tail and adhere it with a little dab of glue.

And before you know it, you'll be done!


I will admit, that the littler circles from the seasoning cap were a pain in the rear. Evidently I don't have very good small motor skills or hand/eye coordination. ;)
6. Now you're ready to adhere the letter and the felt roses to your grapevine wreath. So it lasts and you don't have all your hard work falling off, glue the heck out of it. Place your letters and roses in an arrangement that looks pleasing to you before you begin gluing them, so you can change it if it doesn't look right. Its probably best if you can hang the wreath while you're adhering your decorations because then you can step back and look at it. Since this old house has very few electric outlets and their placement pretty much sucks, I made do with standing on top of a chair and looking down at the wreath. Taking a picture from above and loading it onto the computer helped too. Oh, the perks of living in a 1905 home!


Be sure to get all those little pesky spider webs from the glue off, which I did not do before these pictures. I'm lazy like that. ;)
7. Now you're ready to hang your wreath. Don't you feel fabulous???? Doesn't it feel great to accomplish something??? Yes! Yes, it does!
I feel like bursting into song!
"Hallelujah!"
I used two spools of ribbon to hang my wreath, in lieu of a wreath hanger. I had really hoped to find some really gorgeous heavy ribbon with wire edges to make a bow, but Hobby Lobby was sorely lacking in the ribbon department. I didn't have time to go to JoAnn's Fabrics, so I just made do with what they had. I used two spools of wide width ribbon in a gray tulle (Its actually not tulle, but its not satin and looks like tulle, so I'm calling it tulle. Oh, the little ways my lack of knowledge about crafting is revealed. LOL!) and a white satin. I laid the white satin on top of the gray tulle, and glued sparingly to keep it centered. The next time I'm out and about, I'll get something else. It'll do for now.
And here she is in all her fantastic glory. I think I'll call her my "Grace" Wreath because it was only through the grace of God that I started something and finished it in ONE DAY! Besides, she's too pretty to be saddled with "HCIDKICDIM!" Wreath. LOL!


This baby took me roughly 10 hours, but I was also cooking dinner, doing homework with the kiddos, organizing clothes for school, giving baths, and putting kids to bed. From start to finish, you should be able to finish it in about 4 hours. Easy-Peasy. And cheap! Is there anything better?
No comments:
Post a Comment